Tuesday, 9 November 2010
The Future of Camouflage
Jonathan & Fumiko are taking a break from architectural teaching but Camouflage will continue... watch this space for further updates, continued findings, projects and research.... coming soon!
Tuesday, 29 June 2010
Intermediate Unit 6 at AA Projects Review 2010
Thank you to all of the students for putting together such a great show!
Have a great Summer!
See the online portfolio here!


Have a great Summer!
See the online portfolio here!


Thursday, 24 June 2010
painful playful plywood profile


Hi
we are on schedule for the project review exhibition.
and Im very appreciated of all yours good efforts and it goes to the grand finalle
tomorrow we will have final installation.
the final touch needs all participations by all of us
best
and don't forget to bring the camouflage book ^^
boss
Wednesday, 23 June 2010
Monday, 21 June 2010
Drawing Arrangement update

Version 2

I've changed the scale of each drawing according to the profile grid.
I've taken drawing at very low position away.
And sorry Jonathan since I don't think the perspective way to put drawings will work also it will be a bit strange when look at them from the front, I would still prefer to put drawings in a normal way.
Here is a question for Antoine and Royce. Is that possible to change you two's model position so that all Antoine's drawings can be put together as showed in Version 2? Otherwise I'll use Version 1.
Friday, 18 June 2010
Exhibition Drawing Arrangement
This is the newest version of drawing arrangement. Basically I've tried to move relavent drawings to each model. The top line of drawings is aligned with the top of profile. Lables will be located beside each drawing.
Small prints at the corner position will be decided later(if you have any more good renderings/photos/diagrams please send me ASAP). Angle of drawings will be updated later as well.
We finally decide to print on 160g paper. And we've tried to mount drawings on cheap brown card board as well as white foam board. Samples will be showed in Sunday's meeting.
In terms of hanging small prints, I'll make 2 versions with fish wires. Also can be seen on Sunday.
Everyone's foil model will be put near their fragment to have a better connected story.
Comments are strongly welcome!!!

Monday, 14 June 2010
exhibition plan and elevation


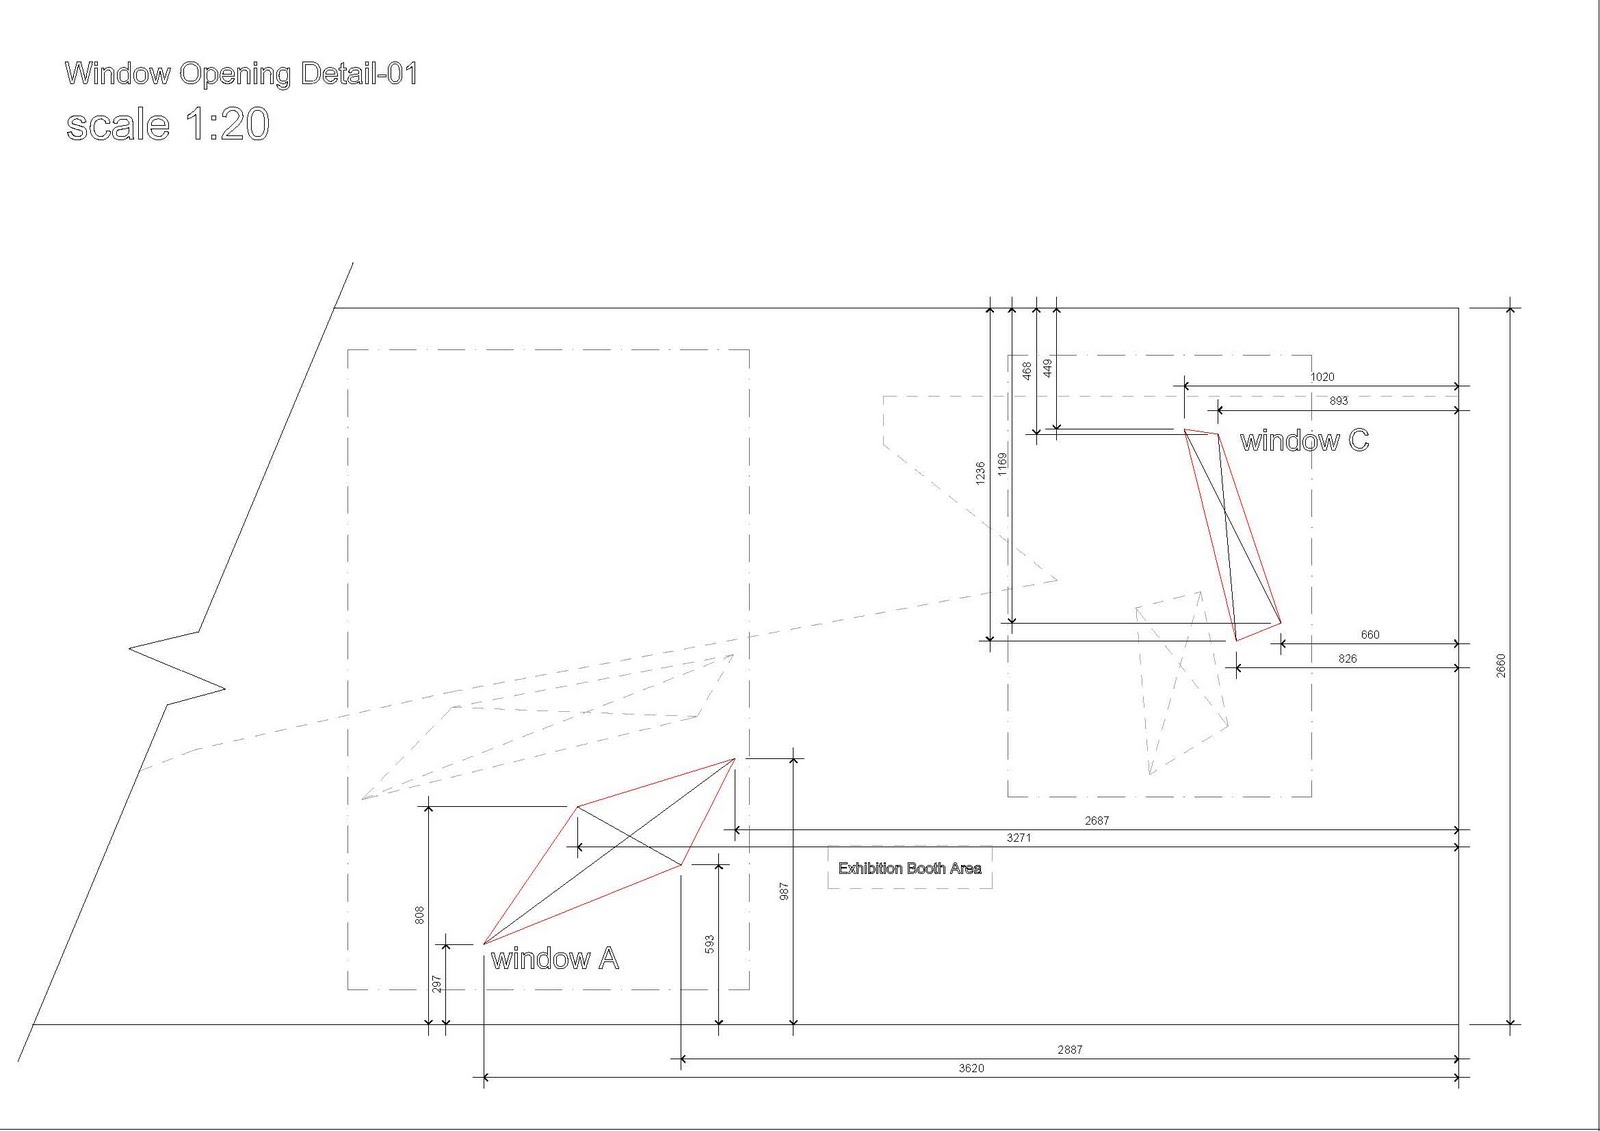


these are the drawing for the window opening on the long wall
kit and chen and ula can refer the elevation for the coordination of drawing the rhino file will be sent via yousendit soon.
Thanks
Jin
Friday, 11 June 2010

Thursday, 10 June 2010
section and view
 interial view from vip looking into changing room
 external view from courtyard looking into bridge
section option 01 , model looking into main show spaces

option 02, model way back to changing room looking into bar access on the left and vips, and shows the relationship g floor of bar with courtyard
thanks
exhibition proposal
 Turnel of Camouflage
the wall area(especially corner) will have denser profile than near the diagonal border
to enhance perspective.
number of layer(profile) : 22
max gap distance : app 400~500mm
min gap distance : app 110~150mm

 the beginning has 2m width openning the end is 1.4m

 some huge wall will be remain as a flat wall for the drawing and other works at the opposite corner and just next to entrance too.
 from the inner corner to entrance right side will be filled with inter 12 works
refer attatched rhino file.
this is very draft.. regarding material and fabrication the proposal could be refined
pls comment.
and we are looking forward to going Hookpark next week.
Thanks
Tuesday, 8 June 2010
key interial nd external view
 01- left to right :view from court yard into back wall of designer entrance then move to stair court of designer studio and finally end up with wall treatment. It shows between perforating quality from archer st glimpes into the courtyard and also the glimpse from couryard into the stairs up to show spaces. while the solid wall treatment contain spacing quality but keep privacy of the studios.
 02&03- entrance from rupert st. the stairs are the entrance for models while it is hidden by introduce perforating wall at the entrance of the bar on the right. and i will apply rough metal on the stairs and mirrored metal on the bar entrance to extreme the case. And larger spacing on the 1st floor of the make-up area to promote people from street to move closer to see more.
 04- i like this interal view but it is not showing what i want it to show at the moment but i am judge the walls to make it work. mainly wanna show the perforating wall is hiding the dressing room back of it but visually make it to be continued with shared wall of the bar. and on this view it is suposed to show the glimpse from the bar(at the left) as well while it is shown as solid as the moment.
05-this angle shows the perforating quality between the bar and the catwalk and it will be best if i can show how the dressing room is hidden while it is stopped on the right edge of the paper..
Thanks
Monday, 7 June 2010
ground floor finished
 looing from rupert street (taking some walls off). the right end is the entrance to the bar which motivates ppl moving in and at the same time to hide the stairs to the make-up rooms on its left.
actually when i am doing this model i realised i need both options i posted earlier, the rectangular and triangular... because they are doing different things. not very happy about entrance from archer st which is at the top, i am going to refine it later.
thanks
part of the model

this is just small part of model(ground floor right hand side) contain wall treatment, perforating wall, and extends of 3d wall thickness either inside/ outside for typical reason.
still no material but i think it is fine for the patterning page, the 2nd part of it, which shows 3d wall out of 2d pattern? anyway i am trying to finishing the model today for more discuss tomor. Thanks

there are two options for the perforating wall. i like the first one which bring two quality inside and outside. i am not putting material to render now but the different effect will be more extreme after i render it with metal. at the moment the largest spacing is 900mm tough it lookes quite closed here. more perforating quality can be seen with different angle, i am showing this angle because i can only get the lighting correctly like this. I am building up the wall by rhino now so we can discuss the whole model tomorrow. And I am thinking to 3d print these element and then wrap it with aluminum sheet. what do you think?
thanks
03- patterning 01- 2d pattern a2

this is for the 2d pattern. and some parts of the pattern are wall treatment and some are perforated wall as i sketched in the last post. Would it be better if i extrude the perforated wall to the right side of the panel and show then as wired frames as 3d surfaces?
Thanks
Sunday, 6 June 2010
endgame 06 - perception views - draft
 1. view from carnaby/ beak street intersection... the bentley enters the building
(better quality render of facade and portcullis that also incorporates the visible interior brick walls will replace this)
 2. view from the lobby: maurice ascends the stairs


 2. view from the lobby: maurice ascends the stairs
 (needs to be re-rendered with internal portcullis, materials and lighting)

3. Client interfacing within executive bar
(I used the 3d print model for the perforations in this view and the next hence they are overscaled and need to be replaced by actual bricks in the final render)

4. the sweatshop works on...
(again needs to be rendered with actual bricks along this surface and have proper figures photoshopped in)
all these views are just a draft to give a sense of what I would like to capture in the final sequence but please let me know whether any of them need to be modified further than what I have aforementioned / if they are not effective yet.
Im currently editing (01) strategic overview and (02) becoming habitat. I have also finished the coded sectional model to be printed tomorrow which hopefully will not collapse despite the cantilevers and perforate walls. Will bring all drafts of drawings printed to scale on tuesday.

03 patterning
 i was trying to pattern the space to bring movement and direction to the programs. But i think i can not show all the patterns once when they are on different levels and overlapped on each other, but for some parts it does becoming interesting such as the top right corner. So would you think i should extrude different levels apart like iso drawing and show the patterns on different levels separately or i should just show the over all effect which make the back faces absent? also, because the b/w pattern is very strong, it is kinds of making some lines to be disappeared, would it be ok? Thanks
Subscribe to:
Comments (Atom)
